top of page

Sunny Picnic
Softwares: Unreal Engine 4, Maya, Substance Designer and Painter

Responsible for layout, lighting, look development, and texturing. Models from CG Trader and Turbosquid. HDRI from PolyHaven. References from Unsplash.
This was my first project utilizing real time rendering with Unreal Engine 4. I loved getting to explore the engine through lighting and materials, especially through the use of raytracing later in the project. Geometry and UV edits were completed in Maya, procedural materials were created in Designer and applied to meshes in Painter, and then all assets were brought into Unreal for material set up, lighting, and final export.
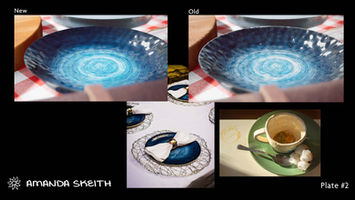
I completed this project over the course of 10 weeks in three parts: a materials exploration, manufactured materials, and organic materials. Once these primary sections were completed, I went back and made several improvements and edits including switching to raytracing. The piece also is comprised of both a new and old version of the scene. This page will go through each section of the project with the breakdowns for that section, and then a final adjustments section which goes over the final improvements made to the scene.
This project was completed with the help of several resources including:
https://docs.unrealengine.com/4.27/en-US/
https://docs.unrealengine.com/4.26/en-US/
https://forums.unrealengine.com/
http://wiki.polycount.com/wiki/GrassTechnique
https://www.palmpiraban.com/salmon-steak
https://genlifx.com/miscs/2022/03/08/creating-realistic-fruits-in-ue4-with-substance-suite/
Scene Reference and Inspiration
Part One: Material Exploration
For this portion of the project, the I developed three procedural materials in Designer and applied them to a sphere and cube in Unreal. These three materials were later applied to models in the picnic scene, with an old version as well.
Because the focus of this part was manufactured materials, in some cases emission is used to fake the look of subsurface scattering.
Model Sheets
Part Two: Manufactured Materials
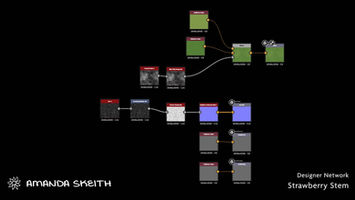
For this next part of the project, I developed the remainder of my manufactured materials for the scene in Designer and then applied them in Painter. I then created an old version for each material in Painter. Maps were then brought into Unreal to set up the shaders. Wherever a map was not needed, I used a constant node switched to a parameter for efficient use in a material instance. I also utilized multiply and add nodes with constant parameters to edit maps in Unreal.
Because the focus of this part was also manufactured materials, in some cases emission is used to fake the look of subsurface scattering.
Model Sheets


Part Three: Organic Materials
In this section I developed the organic materials for the scene. Subsurface scattering played a huge role in these materials. Once I had learned the method, I also went back to several previous materials from parts one and two that were using emission and switched them to subsurface. In some cases such as the background grass and lemonade, emission is still used to aid the look I was going for.
Depending on the material I used one of three methods in Unreal: Two-Sided Foliage, Subsurface Profile, or Subsurface. I used base color maps with a multiply node and constant parameter as the input for Subsurface Color.
Model Sheets


Part Four: Final Adjustments - Lighting, Material and Texture Edits, and Raytracing
To conclude the project, I went back and made several tweaks and adjustments to the materials, lighting, and cameras. The material changes came partly from Substance Painter to change particular maps, but were mostly within the engine through the use of multiply and add nodes and parameters in the material networks.
For my lighting setup, I used a rectangle light as my key light, and another rectangle light and skylight for my fill light. I also utilized a post process volume. In order to achieve a more natural and softer lighting situation, I created a gobo for the keylight using a tileable texture out of Substance Designer and a light function within Unreal. I had used a gobo for the renders of the organic section shown above, but was able to improve its effect in this iteration.
(https://docs.unrealengine.com/4.27/en-US/BuildingWorlds/LightingAndShadows/LightFunctions/)
To achieve a level of realism I decided to switch over to ray tracing as well. Because of this change I also had to make several adjustments to my lighting and shaders, but I am much happier with the result! I really enjoyed exploring the different settings and options in order to improve the piece, especially in terms of the lighting and shadows.
(https://docs.unrealengine.com/4.27/en-US/RenderingAndGraphics/RayTracing/)
Lighting Breakdown
Gobo Map Designer Network

Before


After


bottom of page


