
Lighting & Compositing a CG Object
- Amanda Skeith
- Jan 18, 2022
- 6 min read

Updated: Mar 10, 2022
This blog will document the process of Project 1: Lighting CG Objects through Compositing for Professor Gaynor's TECH420: Technical Compositing Class at SCAD Savannah based on in-class lectures and demonstrations.
1/8/2022: The first step of this project is to decide whether I will be taking my own photos or using an existing photoset. I wanted to take my own photos, but was not able to obtain the needed equipment in time. I am excited to take my own photos for Projects 2 & 3!
For this piece I will be using a photo set from the class library courtesy of Sarah Van Alstyne. Thank you Sarah!
To begin the process, I brought the cube photo into Maya and set up the camera to match up the perspective.
By using the metadata from the photos I was able to see the resolution, focal length, and camera information, which I then used in Maya to accurately create the camera.


1/10/2022: I am also still brainstorming what objects I would like to roll through the shot. My current ideas are lemons or a gold vase.

References from Unsplash.

1/11/2022: I continued working on the project by adding in a keylight and matching up the shadow from the plate to the shadow on the CG plane. I also added fill light using the chrome ball image from Sarah's photoset. I generally use a geodome for positioning the lights, and a skydome for rendering.


Once I was happy with the cube match, I moved onto matching up the ball and working on the light intensity and key to fill ratio. At this point I began setting up my render layers, beginning with a ball layer and a shadow layer. By setting up a perspective projection on the ground plane with an image of the clean plate, I was able to add in the bounce light from the ground.


From left to right: original line up over ball background plate, ground bounce light over ball background plate, reworked key to fill ratio over ball background plate, original ball background plate.

Shadow layer.
I also wanted to start developing the asset I am going to have move through the shot. Since yellow is my favorite color, I decided to go with the lemons! I modeled and UV'd the lemon, and then spent some time on look development. I plan to still make a few more tweaks, as I think the color is still slightly off and it feels a bit too glossy.


Look development rig render (HDRI by Greg Zaal from HDRIHaven) vs. Reference (from Unsplash).


1/16/2022: I decided to go back and make a few adjustments to the look development of the lemon to try to make it more accurate to the reference. To finalize the asset, I made these changes:
- Adjusted the base, subsurface, and radius color to give the lemon more warm undertones.
- Adjusted the bump map parameters to make the bumps larger and slightly more prominent.
- Made the surface less glossy by lowering the coat weight in the shader.
- Tweaked the IOR and roughness to get a larger highlight.
- Altered the base color map of the stem to give it more noticeable variation and less saturation.
I also switched out the HDRI from HDRIHaven for the HDR from Sarah's photoset, as I realized it made more sense to put the asset in the lighting closest to what it will be in the final shot.


One issue that I am running into is that when I put the file on the farm to render out a turntable, the brownian procedural map I am using as a bump map is disconnecting. I will have to keep troubleshooting this to figure out why it is happening.
Next, I continued tweaking the light position to correctly match up the plates. I realized I did not have my HDR and keylight positioned correctly, because the pinch of the dome was not at the back center of the shot. I readjusted that and then matched up the cube shadow.


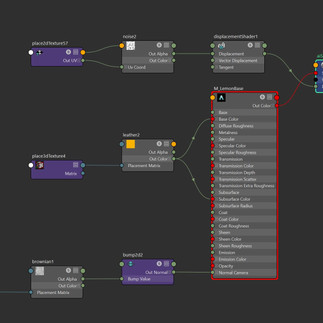
After working on the light direction, I changed the sphere shader from a lambert to an aiStandardSurface and adjusted the key to fill ratio. I developed the shader to match the gray ball in the original photography, and brought all of the layers into Nuke to set them up over the clean plate.

Composite (above) vs. Sphere Plate (below).


The next important step is to fix the overlapping double shadows. To fix this, I used the shadow plate from the photoset and used the shadow layer to mask it to the correct shadow region. A transform node was used to realign the plates, as there was a slight shift between the photos.

Composite with fixed shadow (above) and Sarah's Shadow Plate (below).


Next I implemented the process we learned in class to project the complex shadow present on the ground onto the object. By creating a camera from the view of the keylight and saving the image, I was then able to bring the image into photoshop and paint a red mask over the shadow. I then created a new render layer and assigned the objects a surface shader with a perspective projection from the keylight camera.


It will still need some tweaking and I would like to try to get a higher resolution map, but I am happy with the progress so far! The last update I implemented today was adding in the object and ground occlusion layers. Here is the final update for today!

Composite (above) and Render Layers (below).


1/18/2022: Today I worked on rendering out an animated sequence of the grey ball moving through the shot, and then I added my lemon to the scene.
I definitely do not think the environment shadow projection is working quite yet, so that will take more time. The contact shadow is also needs some more work, and I also need to fix the double shadow occurring on the ball from the environment shadow projection.

And here is the first render of the lemons! Looking at this image I still am not liking the environment shadow projection, and the bump map feels too high or the scale is off. However I think it is a good first pass with the actual objects.
I am still having the issue with the brownian procedural bump map on the renderfarm. Locally it works just fine as seen above, but on the farm it disconnect as shown below.

1/20/2022: After talking with Professor Gaynor and the class, we found that I wasn't able to get a higher resolution mask for the ground shadow projection because my keylight was not fully centered on the scene, so I could not get any closer to the scene without it moving out of frame. By going back and repositioning my keylight, I was able to fix the issue.


Once I had this set up working, I rerendered and brought the new layers into Nuke. This time I rendered with the direct and indirect AOVs, so that I could make sure the environment projection only affected the direct light in order to avoid double shadows like we did in class.
One issue I came across was that I was still getting fill light in the direct light AOV, so I was still getting double shadows. After some troubleshooting, I found that when using an aiSkydome, it contributed to both the direct and indirect AOVs. However if I switched back to using a Geodome, it worked correctly as shown below.


Direct and Indirect AOVs (rendered with Geodome)


Direct and Indirect AOVs (rendered with Skydome)


Updated Composites.

1/23/2022:
Final Project Update!
Over the past few days I have tweaked and made lots of final adjustments to the project including:
- Animating the lemons rolling through the shot.
- Final look development adjustments.
- Fixing the issue with the lemon procedural bump map dropping on the render farm.
- Adjusting the softness of the painted environment shadow mask.
- Working with all necessary shading AOVs rather than just direct and indirect, in order to have more control over the environment shadow grading.
- Adding a render layer for a mask to control grading on the lemons to compensate for the reflection of their shadow.
- Final compositing tweaks.
In order to fix the issue of the bump map dropping on the farm, Professor Gaynor pointed me in the direction of using the Arnold utility of baking out the object into a map. I created a new render layer, and added the objects. Since this feature also bakes out lighting information that I did not want, I assigned the objects an ambient occlusion shader, and plugged the procedural map into the color inputs. When I baked out the object, this was the result:

Then I was able to just plug this into the shader as a file and had no rendering issues!
I also brought the environment shadow mask into Nuke and used edge blur to soften the edges more, and then brought the mask back into Maya and plugged it into the projection.

Here is the final render and breakdown video for the project! Thank you to Professor Gaynor and to Sarah Van Alstyne for the photoset!


Background plates, reference photography, and HDR from Sarah Van Alstyne. Lemon reference image from Unsplash.
Comments